
Think Spring: DIY Seed Organizer

Spring will be upon us before you know it, so why not get ready with this easy DIY seed organizer?
Keeping all of your seed packets handy and high and dry is no longer a challenge when you make your own seed organizer out of a few common materials. It is easier than you may think, so let’s get “growing.”
Take a peek below at how to get started on crafting your own!
DIY Seed Organizer
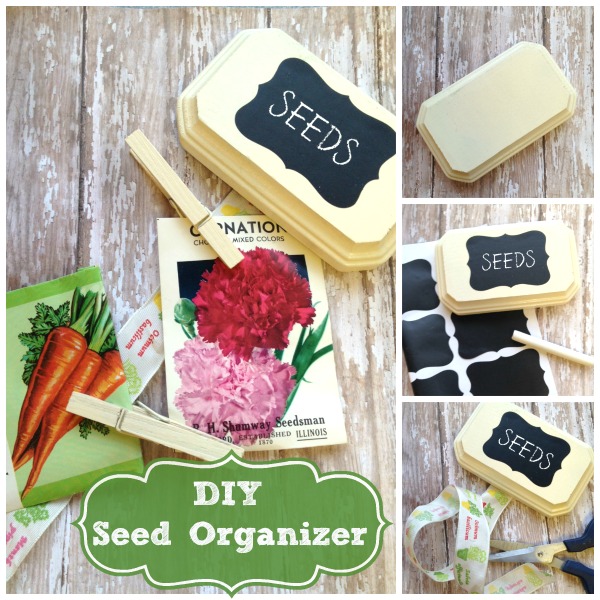
- Supplies needed:
- Wood plaque
- Ribbon
- Chalkboard label
- Chalk
- Clothespins
- Hot glue
- Scissors
We were able to find all of the materials we used at our local craft store.

You can opt for any shape plaque you wish as well as any ribbon you see fit. Pick what works for you and your tastes!
Directions:
1. Begin by peeling and sticking a chalkboard label to the wood plaque. Rub your fingers over it firmly so any air bubbles are removed. You can then write fun garden words such as SEEDS or GROW in it. You can even write the date you planted the seeds.

2. Cut a length of ribbon (a good 12-18 inches is suffice, but it will depend on how many seed packs you have) and hot glue it to the back of the plaque. Cut another small length of ribbon and make a U shape out of it. Glue it to the top of the plaque to act as a wall hook.
3. Next, use your clothespins to secure your seed packets to the ribbon. If you wish, you can paint your clothespins for an extra pop of color and charm.Now all you need to do is hang your seed organizer where it will be handy. As you use your seeds, simply unclip them and clip them back on. It is so easy and such a great way to stay organized!
Gather your supplies and give this simple seed organizer a try.

Spring is coming, why not be ready!
Happy crafting!
Super cute project this would look so festive inside any garden shed. This is a must have, would make a fun activity at a garden party.
What a great idea!! I’m thinking Spring already too!
Such a great way to organize the seeds! Mine are all jumbled in a couple baggies.
What a fun way to organize all of your seeds! I keep mine in a big freezer bag which is definitely not cute! Thank you for sharing at Merry Monday!
We are big gardeners and seed packets laying around on the counter or in the garage drive me crazy. I LOVE this idea! So much so that I chose this post as my “favorite” to be featured on Funtastic Friday, which goes live tomorrow night. 🙂